03 January 2014
Easy Ferris Wheel Craft
January 03, 2014
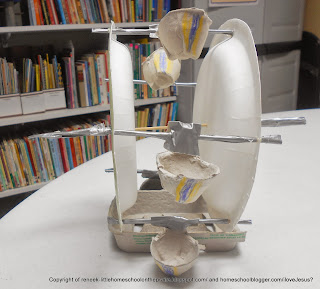
Awhile back the kids learned about the World's Colombian Exposition in Chicago and our focus was on the First Ferris Wheel. We did a fun and easy craft. We made a Ferris Wheel.
I found a few ideas off of Pinterest. Then I adapted the craft off of what I had available at home.
Supplies:
2 paper plates
6 Skewers or short dowel rods. 5 at 16" and 1 at 30". Yours doesn't have to be exact measurments.
Egg carton
Duct tape or hot glue gun
Markers or crayons
Scissors or a knife
First, I cut the egg carton to have tabs on each one so I can attach them to the skewers. This is also when I had the kids decorate the plates and egg carton.
Next, I cut the top of my egg carton in half. This is going to be the base of your Ferris Wheel.
I used Skewer because I knew I cut break them in half with my hands and trim it up with scissors. I found these in my local grocery store for $3.00. I also like that it had a point on one side to poke through the plate.
I put one hole in the center of both plates. Then, I poked five holes with my knife evenly apart on one plate. This is where I cheated with the points as I was able to penetrate the other plate with the skewers.
I used duct tape to keep the skewers in. You could use a hot glue gun to make it look cleaner. I was more interested in having the kids get an idea of how the Ferris Wheel worked with the shaft and such. My kids are younger and I wanted them to attach as much as possible.
The kids then attached the egg carton to the skewers on the outside with duct tape. I was kinda hoping the so called chairs would spin more and maybe be operate more like the chairs on an actually Ferris Wheel. I'm sure there is a way to make that happen. I just didn't put much thought into it.
Then came the fun part. What is a Ferris Wheel if it doesn't spin? Bug tested it out and give it her approval of a fun craft that works.
See she has a smile on her face. Mom felt pretty cool!
Even my hardest one to impress was trilled that it worked.
Have fun creating adventures in your homeschool with fun and easy crafts.
Labels:Homeschool crafts
Subscribe to:
Post Comments
(Atom)


Search This Blog
Grab my button!

Followers
Powered by Blogger.
Homeschool Planet
HSP Free Offer Email for REVIEWERS
Popular Posts
-
We are learning about the Viking in our history studies. What better way the enhance the learning by adding a craft to the mix. With my kid...
-
Disclaimer: I received a FREE copy of this product through the HOMESCHOOL REVIEW CREW in exchange for my honest review. I was not required t...
-
Last week during our study of the Inca culture the kids made an Inca Quipus. If you are not familiar with what a quipus I will try to give...
-
After several weeks of hard work on our Native American Teepee Village Diorama we are finally done. This was a fun project. Everyone is rea...
-
My beloved husband surprised me last week. He bought me a Bosch Universal Mixer with the blender. I have been drooling over it for a couple ...
Labels
20p12.1
4-H
About Me
American History
Ancient History
Autism
Beekeeping
Beekeeping 101
Bible
Blog Hop
Blogging
book
Book reviews
Camera Shots
Classroom
Coding
Curriculum
Disclosure Policy
Egypt
Entomology
Experiments
Family
Feast of Tabernacles
Field Trips
Free Printables
Garden
Geography
Giveaway
Giveaways
Hanukkah
Health
Hebrew
High School
History
homemade
Homemade Bread
Homemaking
homeschool
Homeschool crafts
Homeschooling
Honey Products for Sale
Honey Recipes
Horse Therapy
iPad & Apps
Israel
Just For Fun
Juvenile Arthritis
Kids
Lapbooks
Life Cycle
Life in general
Math
Medieval History
My kid said...
Organizing
Organizing/homeschooling
Our curriculum
Our Week Through the Lenses of a Camera
Passover
Photography
Prayer
Purim
Random Pictures from my Kids
Recipes
Review
Review Policy
Reviews
Rosh Hashanah
Science
Scripture
Sensory Processing Disorder
Shabbat
Shavout
Simchat Torah
Sonlight
Special Needs
Special Needs High School
Special Needs Product Reviews
STEAM
STEM
Stuff
Tish B’Av
tos
TOS Crew Reviews
Tu Bishvat
Viking History
Week in Review
Wordless Wednesday
Workboxes
Yom Ha'atzmaut
Yom Hashoah
Yom Hazikaron
Yom Kippur


0 comments:
Post a Comment
Thank you for visiting my blog.